
How to: Create a digital Riso Christmas card
- 12 nov 2025
- 5 minuten om te lezen
Autumn has arrived, and that means only one thing: Christmas is just around the corner! It almost seems like it's coming earlier every year.
Today I'm going to teach you how to design your own riso Christmas card from start to finish. Because what's more fun than sending your family and friends a homemade Christmas card? I want us all to start sending cards again, because it's such a special feeling. I'm going to show you two examples: one version anyone can make at home and a riso version. This post is all about the digital, risoprint version. For the home-made card, you can visit this link.
Preparation
For the design, we'll start by creating a mind map! A mind map is a great way to generate ideas because it essentially lets you get everything out of your head. It also gives you a visual overview, making it easier to arrive at a good design.
What do you need for this?
1 piece of random paper, any kind or size!
Something to write with.
A Christmas playlist and something to play music with to get you in the Christmas spirit!

In the center of the page, write the topic, in this case "Christmas card ideas." From there, write down everything that comes to mind about this topic. For example, I was thinking mainly about the winter cold, and that brought up all sorts of other associations related to that word, such as scarf, snow, mittens, and so on. Fill the entire page with everything that comes to mind until you're satisfied.

Once your page is filled, you can start selecting items on the sheet that you can already visualize. For this design, I chose snow, a scarf, Christmas ornaments, socks, and mittens. You could also create a mind map of Christmas cards with even more unusual themes and draw even wilder associations. Think of cold → warm → sun → a Christmas card of a sun wearing a scarf. It doesn't have to be "right."

SKETCH PHASE


Version 1: Riso Christmas card with digital base
This post is about creating a digital card that you can then riso-print! I created a file in Procreate. I'm using A3 size because I prefer to work a bit larger so I can scale it down to card size (which is A6!). This way, the quality stays high. Once my file is ready, I start setting up a composition.

Step 1 (composition):
My composition consists of rectangular shapes that I want to fill. This way, I try to create a fun, busy illustration that gives me space to incorporate all my ideas, while still maintaining a clean, coherent whole. When I begin my project, I carefully consider the message and atmosphere I want to convey. Once I have a clear idea, I start sketching. These sketches are often still rough and serve primarily as an outlet for my creativity. I slowly fill my page with all my chosen elements until I'm satisfied.
It's a process of trial and error; sometimes I have to readjust or even remove elements to find the balance I'm looking for.

Step 2 (drawing lines):
Once I'm happy with my sketch, I start working on the details. Personally, I always start by outlining my sketch, so I have everything neat and ready to color, like a coloring page.

Step 3 (choosing colors):
Once I've completed this step, I start thinking about the colors I want to use. Are you considering having the card riso-printed as well? In that case, it's important to carefully consider your color choices beforehand. This way, the colors will stand out better after the riso process. For my design, I'm choosing three colors: fluorescent pink, yellow, and medium blue. I chose these three colors because they allow me to create blends, but the choice is entirely up to you.
Step 4 (coloring work):
From here on, I'll color my work. Feel free to do this however you like! I'm personally a big fan of color, so I use it a lot in my work.
It's like a coloring page for adults! It's wonderfully calming. Between drawings, I make adjustments whenever I feel something is out of balance. This is a very intuitive process, and everyone has their own way of working. I basically keep working like this until I feel it's finished.
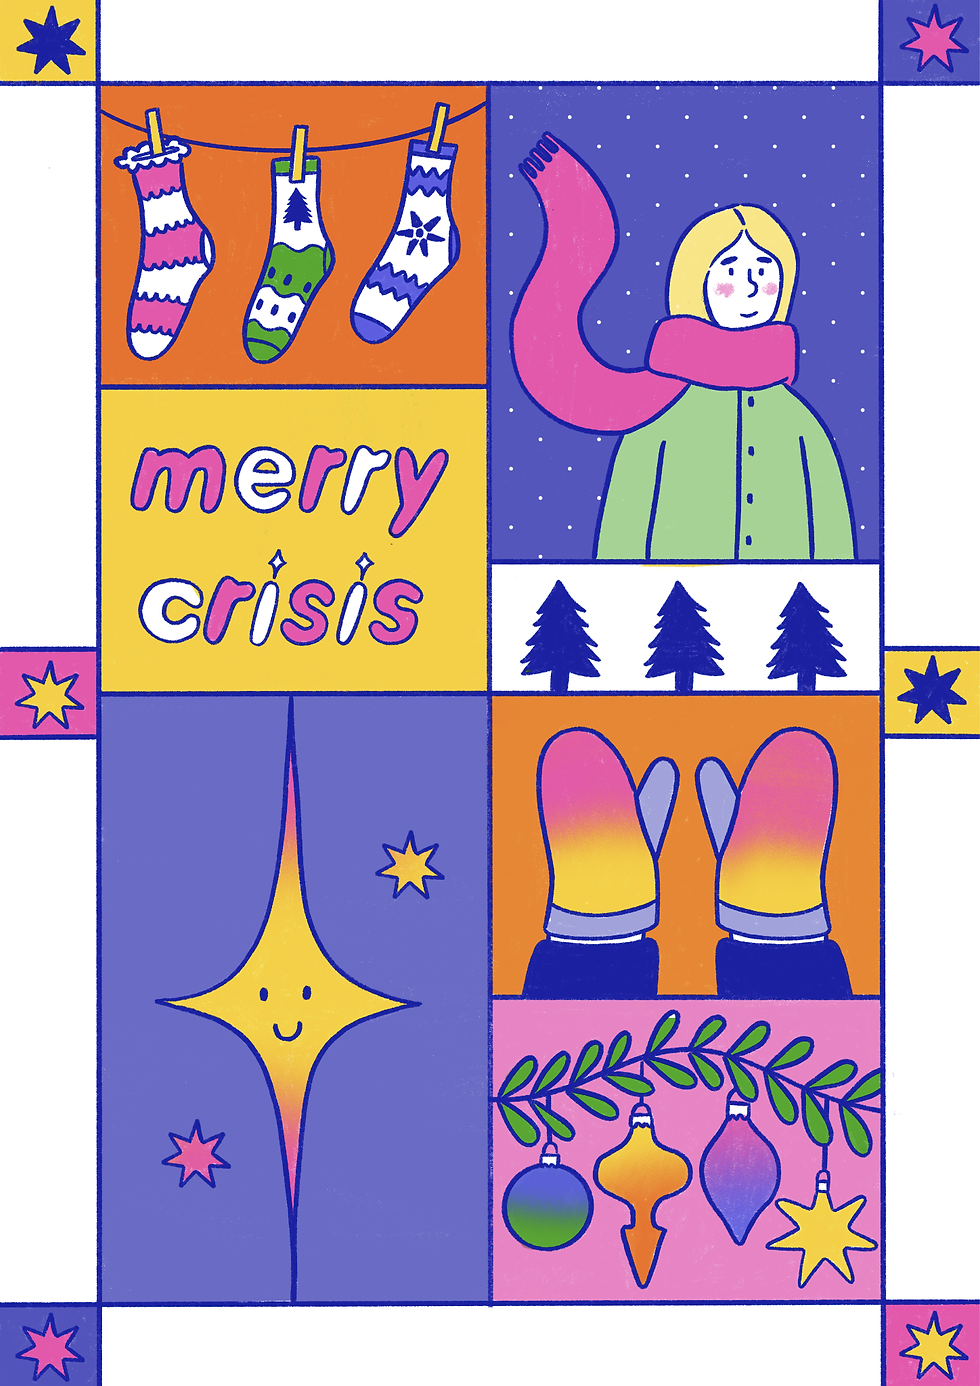
This is the digital end result:
Step 5 (design back):
Once I'm finally done coloring my sketch, I design a simple back cover in Illustrator. (This is completely optional, but it gives it a more professional look.)

Step 6 (setting up file in Adobe):
It's high time to set up the official file in Adobe. Before we can start printing, it's crucial that our files are properly prepared.
First, you're going to scale your A3 size layers correctly in the file, because you want to get 4 A5 sheets on an A3 layer.
Create a file in Photoshop of A3 size, portrait or landscape orientation does not really matter.

Now open your digital card in Photoshop in a new file (not in the A3 file).
You go to image -> image size.

Then you enter the size of an A6 (10.5 cm x 14.8 cm)

Now you've scaled your color layer correctly and can place it in the new file. You'll place eight of them in total.

Select all eight of these by holding down Shift while clicking the layers. Click "Merge Layers" in the lower right corner of the screen (right-click on the layers) to make everything a single layer.
Then, scale them down a bit to create a white border around your work. This is because the riso printer doesn't like ink getting too close to the edge. This is essentially a precaution, but a very important one!

Now you have a good layout for your cards! Want to do this really neatly and precisely? You can also use InDesign or a special Photoshop layout (I'll talk more about this later, in a separate blog post).
To get your riso colors ready, there's a way to separate them in Photoshop. Read more about how to do this here !
Step 7: (Printing time!!!)
The time for printing has finally arrived! Want to learn more about the printing process? You can take a workshop at our studio. If you're interested, check out the website! Starting in January 2026, we'll also be offering studio Sundays—open days where you can come and glue, cut, work, and print! Hooray!
Would you like to print your own Christmas cards? That's possible too, just contact me. We can then schedule a printing date.
