
how to: digital illustration to riso print
- May 10, 2025
- 3 min read
Bringing your own illustration to life with a riso print, that is one of the most fun things to do. But how do you do that? I will explain that to you today!
Step 1
Before you can riso print anything, you need to have a design. That's why you start by making an illustration. This can be anything, but above all make something that makes you happy and don't think too much about the colours you use and whether they are good for riso. Just design whatever you want, in the colours you want. That will all work out fine later!
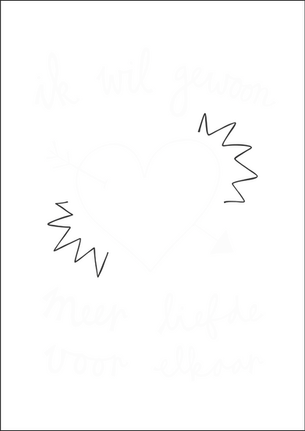
I made a poster for the #ikwilgewoon project of Ellis (check out www.ikwilgewoon.nl or @ ik.wil.gewoon if you want to know more about this). Below you can see my design. I want to riso print this design.

Step 2
If you have created the illustration digitally, save it as a PDF or JPG. If you have created the illustration analogously, scan it as a JPG. Then put your illustration in Photoshop. You can also use Spectrolite for this process, an app specifically for riso coloring, if you have a Macbook. A separate blog about this will follow later.
Step 3
Make sure your riso file is in the color mode 'CMYK'. This stands for Cyan, Magenta, Yellow and 'Key' (which is black). This is the mode you will use most of your printing, also non-riso work. If not? Go to: Image > Mode > CMYK color.

Step 4
Next, go to channels. This is usually on the right side of your screen, at the bottom, next to the 'layers' tab. Is it not there? Then go to Window (at the top of your screen) and then 'channels.' This will open the channels tab. Then click on the three small lines at the top right of the open tab and click on 'Split Channels.'


You will now receive 4 different Photoshop files, each file is one color. You have the colors cyan, magenta, yellow and black. With these four colors, you can in principle mix almost all riso print colors! If you have used all these colors in your illustration, you will see a part of your illustration with each file. It could also be that one of the files remains empty, then you have not used that color. For example, I have not used black, so I do not have to print that color. You can then click away that file.
If you did use black, you can also choose to add it to the cyan layer, so that you only print 3 colors. Printing four riso print colors on top of each other is quite a lot. It is best to keep this to a maximum of three colors with riso print because of stains, drying time and the sticking of the paper.
Adding black to the cyan layer is done by unlocking the black layer in layers (so that it is no longer a background layer), and cutting and pasting it on top of the cyan layer. Then choose the layer mode for the black layer for 'multiply', (this button is set to 'normal' by default and is just above your layers. It is a dropdown menu). Merge the layers by selecting them both and clicking 'merge layers'.

Step 5
You now have all the separate color layers. Make sure you check them before you save them. You can do this by holding the illustration with color next to it, and see if everything is correct. For example, did you use a lot of yellow? Then you should also see that your yellow file is a bit darker and shows more of your illustration.
This is what my files came out:


cyan yellow magenta
Step 6
Once you have checked everything, you can save the files as a PDF. Pay close attention to which color layer it is and save your file with that color. You do this by going to save as... and choosing Adobe PDF. Make sure the file remains small. You can do this in the PDF options for PDF/X-1a:2001. Give them all a clear name. For example: riso poster yellow, riso poster magenta and riso poster cyan.

Now you are ready to print! Take a look at workshops to see what kind of workshops and courses you can do at Studio Misprint. Would you like to come and print digitally with a previously made design? This is also possible, soon there will be a strip card online with which you can come by on Sundays to create. :)


Comments