
how to: make riso buttons
- Aug 28, 2025
- 4 min read
Today I'll show you how to make my own buttons! Buttons are back in style and are popular on clothes and bags. They're a fun and easy way to brighten up your outfit :)
The Design of the Button
We'll start by designing the button. It can be anything, as long as it fits in a circle. A button is always round (although there are also square or oval versions, but the round remains my favorite). This means that everything you make must ultimately fit in a circle. There are all sorts of sizes, but today I'm working with small buttons of about 2.5 cm.
I started with some quick sketches and then finished the design in Procreate. I wanted simple buttons with a fun and whimsical design. I like buttons best when they provoke a reaction or make someone laugh. Two of the designs were inspired by illustrations I'd made before ( the horse , the car ), and the other two I came up with on the spot.
Design Tips
A small but important tip: always calculate the size of your design and ensure you have a generous border in the background color around your illustration. This border will disappear into the side of the button, preventing white edges. The photo on the bottom right clearly shows how I did this. This is a detail that can save you a lot of frustration.


From Sketch to Print
I made six sketches, but ultimately chose the four designs I liked best. Once the design was completely finished, I converted it into three layers of color for the riso printer. You can read exactly how to do this in my previous blog post about converting your illustration to a riso file.
Printing process
Then it was time to start printing!
I chose three colors: yellow, magenta, and aqua blue. Together they almost form a kind of CMYK, but I omitted the black so I had three layers instead of four. My design did contain black, but I solved that by making the blue in those areas extra dark. This way, you get a deep, dark color without using black.
With Riso, you always want to start with the lightest color, so I started with yellow. Then came magenta, and finally blue. The moment the third layer is added and everything suddenly comes together is always so exciting! Each print has small differences and imperfections, and that's what makes it so vibrant.


Assembling Buttons
After printing, I let the sheets dry thoroughly. Then I went to Kapitaal to assemble the buttons. I don't have a button maker myself (yet), but Kapitaal has one ready, and it's always a fun time. This way, it feels more like a small party than just a chore.
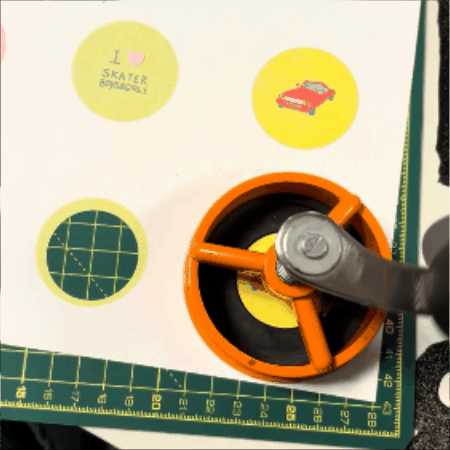
The first thing I did was cut out all the circles. I did this with the device you see below. There were 60 buttons, so this was a bit of a job. If you don't have this device, you can also just use scissors or a compass.
Pressing the Buttons Together
After cutting out the circles, I could really get started. You need a special tool for this. Assembling the buttons takes three steps. The video below shows the first two steps.
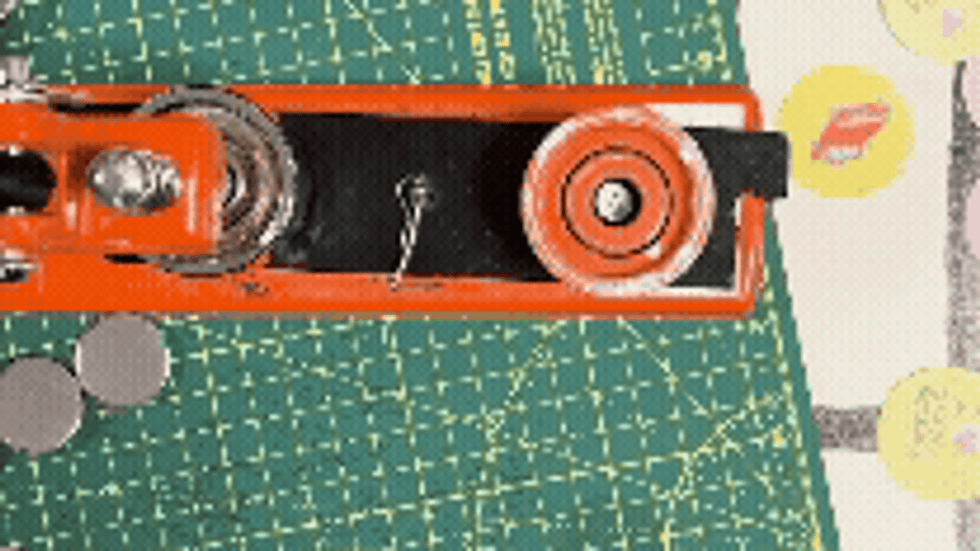
Each button consists of three parts:
a metal top (where your design goes),
a plastic layer (for shine and protection),
and a metal ring into which the needle will later go.
The button maker has two sides. One side for the top of the button, the design, and the plastic layer. And one side for the bottom (the ring) of the button, to which you then add the top and press them together.
First, you place the metal top in the device, then your design on top of that, and then the plastic layer on top of that. Press it down, then move the entire ring containing the button to the other side of the device. The metal ring is already there, so you press the button and the metal ring together.
It already looks like a button! The only thing missing is the pin. With the buttons I used, you simply click the metal pin into the back. And ta-da: the button is ready!
Here's how you do it:

The End Result
This is how the buttons turned out!!


This was another super fun way to get started with Riso, and I'm really happy with the results! I'd made buttons before, but using the Riso printer for the design this time really made the colors pop! I've already pinned two bags and one pair of dungarees...
More Inspiration
Want to see more of the process? I have a video on my Instagram where I show you how I make the buttons, from printing to assembly. It's always fun to see it in action!
I hope this blog has inspired you to try making your own buttons. It's such an accessible way to bring your illustrations or graphic designs to life. And the result is immediately wearable, which is perhaps my favorite part.
After reading this, are you thinking: I want to do this more often ? Then owning your own button maker might be a good investment. There are simple, small kits for beginners and more advanced devices if you want to do it more often. This way, you can create endless new buttons—for yourself, to give away, or maybe even to sell. This might be the one for you. Have fun!
Have fun experimenting and creating ✨


Comments